Why I won’t spend a fortune on a gaming microphone
I admit, I’ve been guilty of buying gaming microphones that are painfully out of my budget, if only to not sound totally amateur in my team chats. But that was before I discovered filters in OBS Studio. The truth is you don’t need to spend a fortune on your gaming microphone. In fact, even a sub-$50 mic can sound amazing with a few simple filters.
Further reading: The best USB microphones for streaming
Why I use OBS Studio for my gaming micAn obvious question is: Why don’t I just use my microphone’s companion app which has been optimized especially for it? For me, there’s a simple reason for this and that is, OBS standardizes the settings and eliminates any annoying quirks specific to a particular microphone that I don’t know about.
In OBS I can apply the same filters and settings to just about any mic, and it will sound terrific. Plus, any changes I make also work in Discord, Zoom, and my game chats. But don’t just take my word for it; if you’ve got a gaming mic, let’s get it sounding great…
The steps to broadcast qualityFor the sake of this “how to,” I’ve applied OBS filters to a $120 HyperX Quadcast S, which was the only microphone I had on hand at the time of writing.
Admittedly, the Quadcast S is a grade above many cheaper mics. Still, without applying the OBS filters to it, it’s not going to sound broadcast quality for my voice. In the past I’ve applied the same filters to the $49.99 Razer Seiren Mini and had a similarly good result. The point is, this process will work perfectly fine for just about any mic you want to use it on — so don’t spend a lot; you can go cheap!
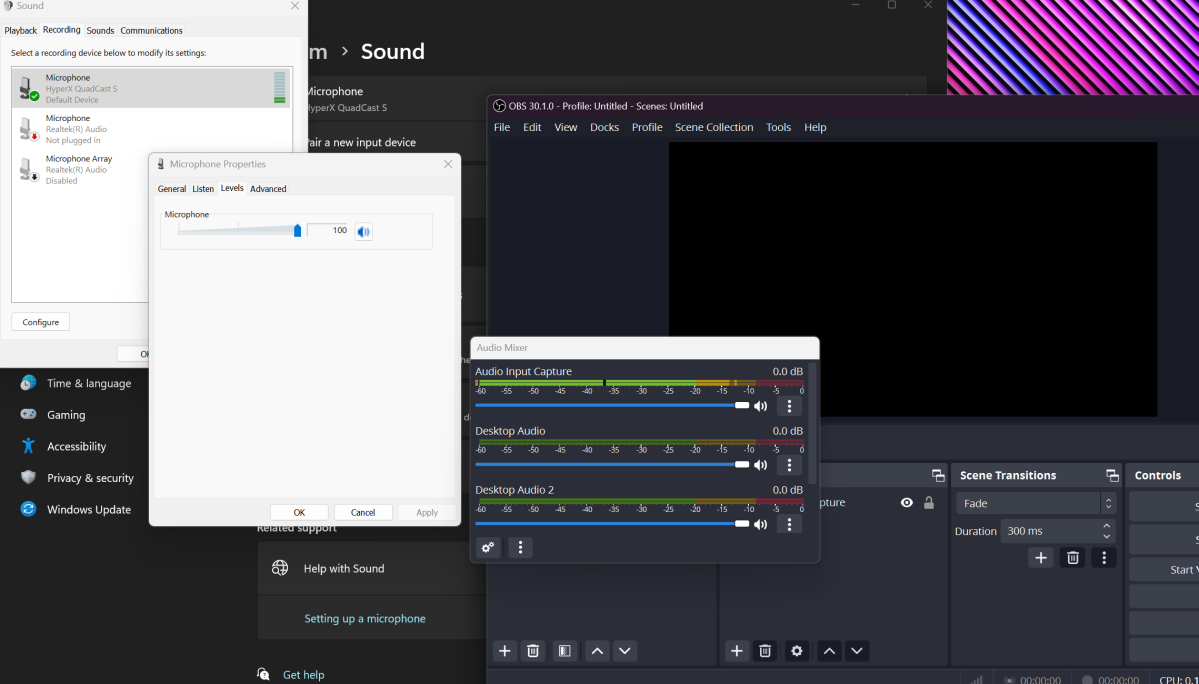
Step 1: Adjust the gainIn Windows 11, I right-click on my audio icon, then chose Sound Settings > More Sound Settings > Recording. Then, I double-click on Microphone and select Levels. I then adjust the gain level until the sound is registering in the yellow part of OBS’s sound meter. The level is going to be different for each microphone, so for best results do this step in real time until you get the desired result. You may also need to adjust the volume level on your microphone too.
Tip: If you set your gain to 100 percent in Windows and still aren’t recording in the yellow, open your filter menu in OBS, right-click, and add a Gain filter.

Dominic Bayley / IDG

Dominic Bayley / IDG
Dominic Bayley / IDG
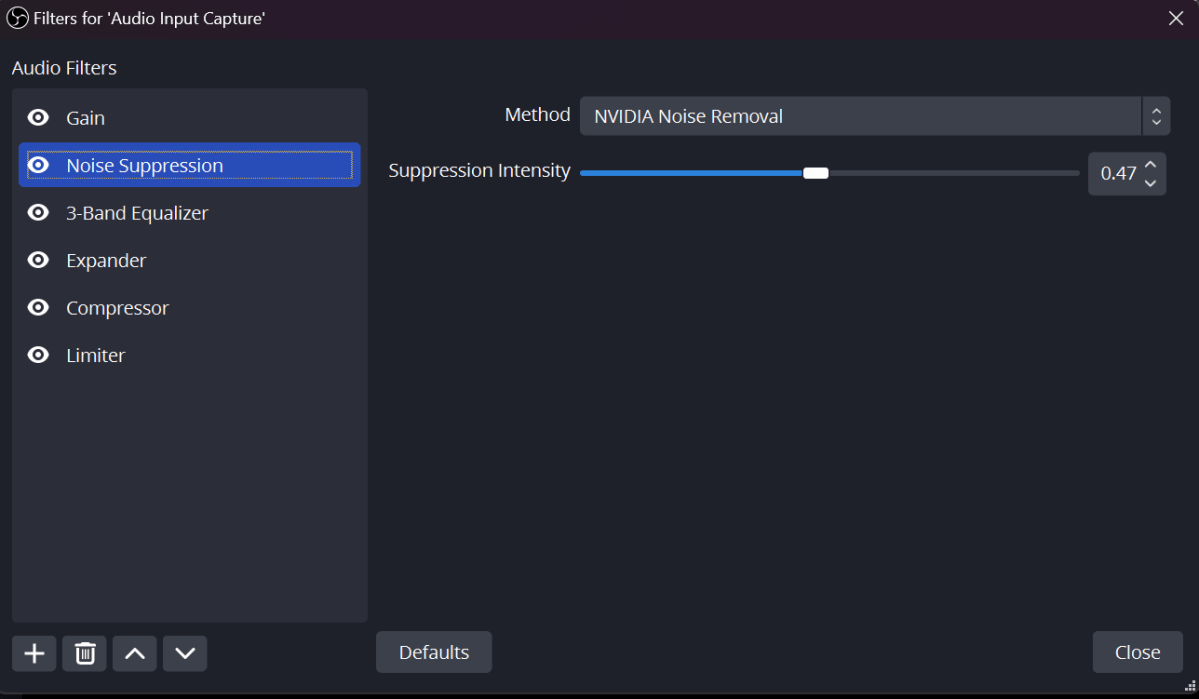
Step 2: Add a Noise Suppression filterFor this step I first have to change some settings so that I can hear my microphone through my headset. To do that, I click on the icon with the three vertical dots in the OBS Audio Mixer and select Advanced Audio Properties > Audio Monitoring. Next to my microphone source (Mic/Aux) I then select Monitoring and Output.
Now from my list of filters in OBS I select Noise Suppression. Several options pop up. I have an Nvidia graphics card, so I choose one of the Nvidia filters, Nvidia Noise Removal. If you don’t have an Nvidia card, one of the other options should work fine. I then adjust the suppression levels with the slider until my voice sounds clean and crisp and free of background noise.
Tip: This should be done first before you add any other filters. It clears your voice of any distracting or unwanted background sound. If you can’t see the Nvidia Noise Suppression filter in your list, you may need to download an Audio driver from Nvidia.
Dominic Bayley / IDG
Dominic Bayley / IDG
Dominic Bayley / IDG
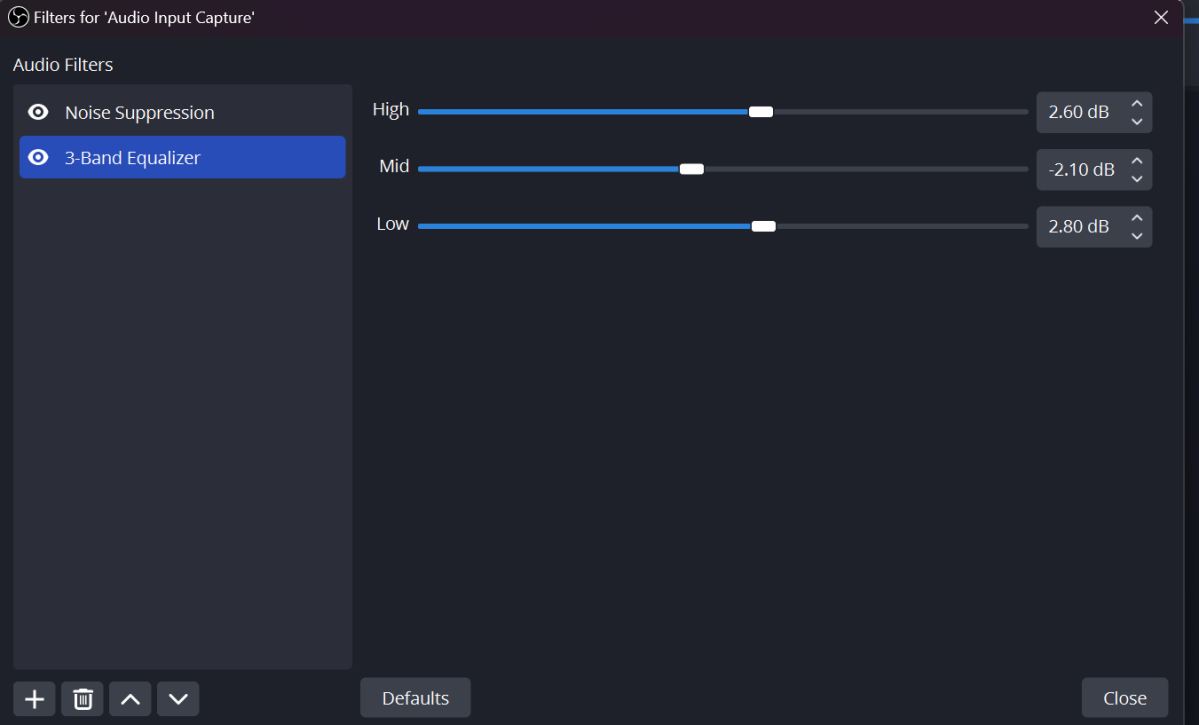
Step 3: Add a 3-band equalizer filterGetting this right is really important to fine-tune the tone of my voice. First, I select the 3-band equalizer filter from the OBS filter menu. Three bands appear. I then reduce the mids by a fraction from the starting point of zero and increase the highs and lows just a fraction. This gives my voice a warm broadcast-like quality.
Tip: Play around with these values until you get a broadcast quality to your own voice. If your voice is already quite low and authoritative, don’t raise the slider for the lows by much; you don’t want to overemphasize the bass.
Dominic Bayley / IDG
Dominic Bayley / IDG
Dominic Bayley / IDG
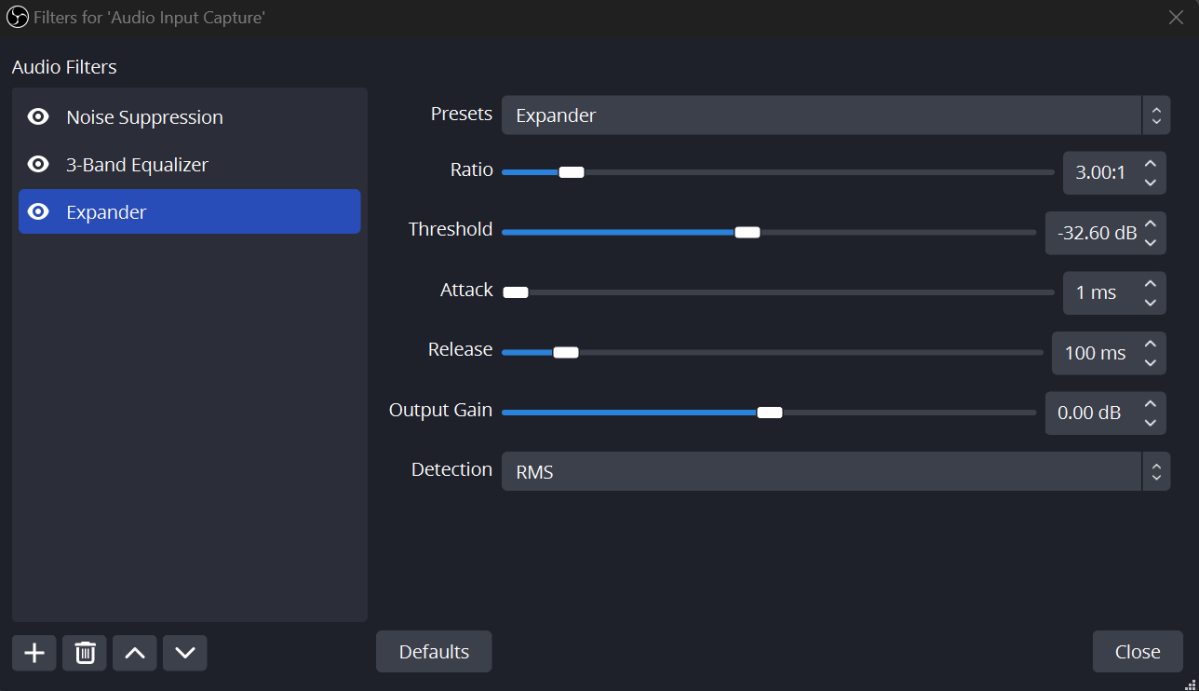
Step 4: Add an Expander filterThis filter ensures that no matter how quietly I talk my friends will still hear me. After selecting the filter from the menu, I change the Ratio to 3 and the Release to 100. I then set the Attack value to 1ms and move the slider for Threshold all the way to the left.
Speaking very softly into my mic, I then gradually increase the Output Gain until my OBS volume meter is registering the sound of my voice in the yellow section of the meter. Then I creep the Threshold slider to the right, stopping it at a point before my voice becomes too quiet to hear.
Tip: You may need to adjust the Threshold for different audio types you’re recording or different in programs, so keep an eye on this setting and change it when required.
Dominic Bayley / IDG
Dominic Bayley / IDG
Dominic Bayley / IDG
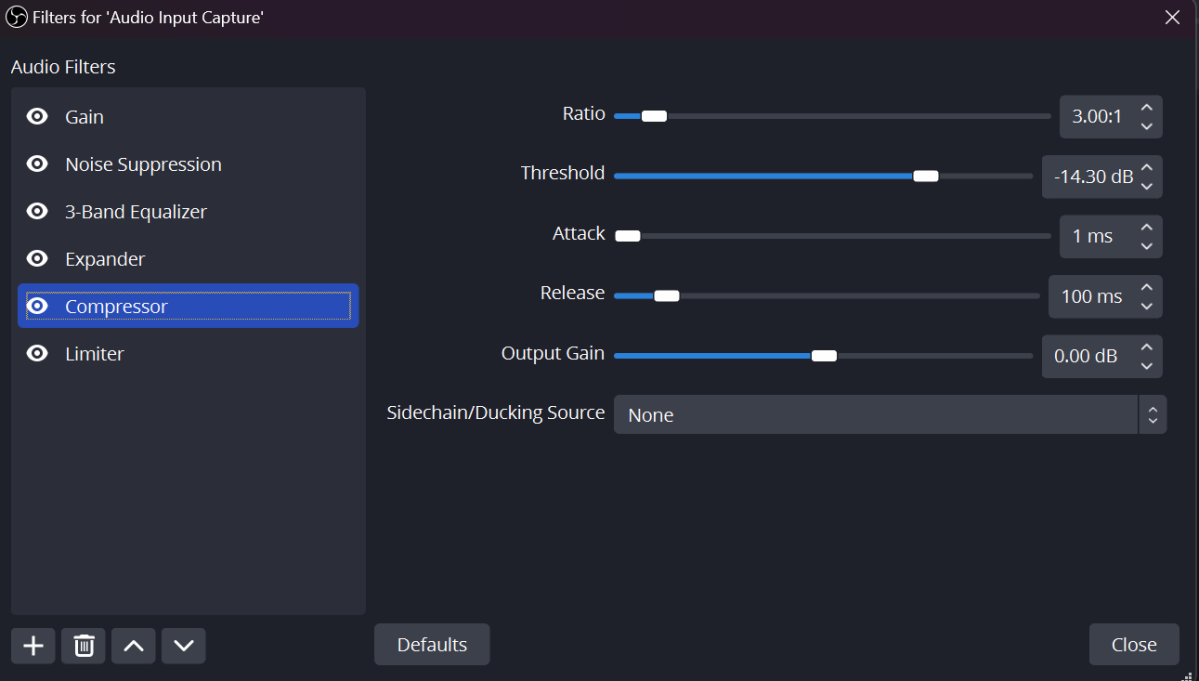
Step 5: Add a Compressor filterThis ensures my voice will always be heard at a constant volume even if I make a loud noise. To enable it, I select the Compressor filter from the menu. Once again I change the Ratio to 3 but this time, I move the Threshold all the way to the right. I then set the Attack to 1ms and the Release to 100.
Now speaking loudly, I gradually move the Threshold to the left until my volume is comfortably appearing in the yellow part of the OBS volume meter.
Dominic Bayley / IDG
Dominic Bayley / IDG
Dominic Bayley / IDG
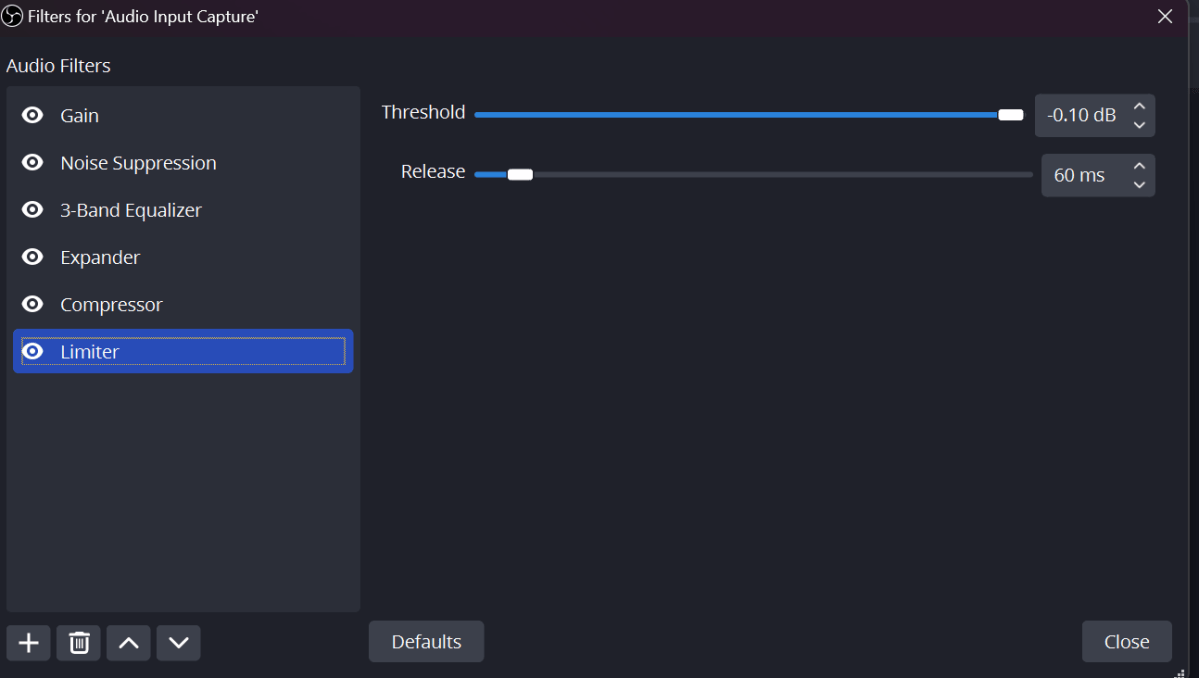
Step 6: Add a Limiter filterThis last filter ensures my audio has a top limit for volume so my listener’s ears aren’t blown out in case the odd loud sound enters my audio stream. After selecting this filter, I simply move the Threshold all the way to the right and click the down arrow so that I get a value of -0.1.
Dominic Bayley / IDG
Dominic Bayley / IDG
Dominic Bayley / IDG
A final stepFinally, I have to make sure my OBS filters works in my gaming chats and Discord. To do this, I download Virtual Cable and extract the file. I then right-click on VBCable_Setup_x64 and selected Run as Administrator to install it to my PC. In OBS, I then select Settings and change Monitoring Device from Default to Cable Input (VB-Audio Virtual Cable).
Tip: You’ll need to select VB-Audio Virtual Cable as the output in every program you want to use your microphone in. For example, in Discord you simply go to User Setting > Voice and Video > Input Device and choose Cable Output (VB-Audio Virtual Cable).
The resultMy Quadcast S sounds like a new microphone! My voice sounds a lot warmer and clearer than it did before and has a broadcast-like quality that makes me sound like a pro streamer. I’ve virtually eliminated any background noise, and no matter whether I speak softly or loudly, my friends will hear my voice at an acceptable volume.
If you’re looking for a USB microphone to try this out on, be sure to check out our list of the Best USB Microphones for Streaming. They work just as well for your gaming needs. Happy tweaking!
Gaming