What is the Purpose of Blockchain Technology in 2024?
 foundry banner
Foundry is a smart contract development toolchain.
Foundry manages your dependencies, compiles your project, runs tests, deploys, and lets you interact with the chain from the command-line and via Solidity scripts.
Now you can write tests and scripts for your contracts in the smart contract language itself, i.e. Solidity.
Follow the steps for a basic guide to using foundry:
To initialize your first foundry project, open the terminal and type in
forge init first_project_foundryThis would initialize your project. You could see several folders once you open the project. These includes:
- lib
- script
- src
- test
and many other files. We’ll discuss each of the things in later articles.
lib folder consists of the all libraries that the project requires. This includes forge-std by default. If suppose we use open-zeppelin’s contracts or the ones’ from chainlink, we’ll install them. The src folder contains all the contracts of the project, script folder has the scripts for the project and test consists of all the tests written for the smart contracts in the src folder. The tests and scripts in foundry are written in Solidity.
Let’s start with the contract.The smart contract for this tutorial will be a basic one. It’ll store a number and have certain basic operations like increment the number and increase it by adding a certain number, say 5. Let the contract have another state variable that stores a greeting. We’ll have a function that takes in name of a person and then greets them.
Suppose if you pass name as “Dheeraj”, it should return “Namaskaar, Dheeraj!”.
In the src folder, create a file “SimpleStorage.sol”. This is our main contract.
// SPDX-License-Identifier: MITpragma solidity ^0.8.18;
contract SimpleStorage {
// our favouriteNumber
uint256 public favouriteNumber = 7;
// greeting
string public greeting = "Namaskaar";
// increments the favouriteNumber by 1
function incrementNumber() public {
favouriteNumber++;
}
// adds given number to our favouriteNumber
function jumpNumberBy(uint256 jumpBy) public {
favouriteNumber = favouriteNumber + jumpBy;
}
// sets greeting to the given greeting
function setGreeting(string memory _greeting) public {
greeting = _greeting;
}
// greets the user
function greet(string memory name) public view returns(string memory) {
string memory greetingMessage = string.concat(greeting, name);
return greetingMessage;
}
}
To compile the contract above, run below commands:
forge buildor
forge compile
Now, let’s write some tests for the above contract to ensure the contract functionalities works as desired.
Create a file in test folder and name it “SimpleStorage.t.sol”.
- setUp(): This is the function which runs before each test case executes. This generally includes creating contract instance and setting state variables.
pragma solidity ^0.8.18;
import {Test} from "forge-std/Test.sol";
import {SimpleStorage} from "../src/SimpleStorage.sol";
contract SimpleStorageTest is Test {
SimpleStorage simpleStorage;
function setUp() public {
simpleStorage = new SimpleStorage();
}
function test_ReadStorageVariables() public view {
// I have set favouriteNumber to 7, the jersey number of MSD, let's check that
assertEq(simpleStorage.favouriteNumber(), 7);
assertEq(simpleStorage.greeting(), "Namaskaar");
}
function test_IncrementNumber() public {
// this should increase the value by 1, at first, it was set to 7
simpleStorage.incrementNumber();
assertEq(simpleStorage.favouriteNumber(), 8);
}
function test_JumpNumberBy() public {
uint256 jumpBy = 5;
simpleStorage.jumpNumberBy(jumpBy);
assertEq(simpleStorage.favouriteNumber(), 12);
}
function test_SetGreeting() public {
string memory newGreeting = "Jai Shree Ram";
simpleStorage.setGreeting(newGreeting);
assertEq(simpleStorage.greeting(), newGreeting);
}
function test_Greet() public view {
string memory name = "Dheeraj";
string memory greetMessage = string.concat(simpleStorage.greeting(), name);
assertEq(simpleStorage.greet(name), greetMessage);
}
}
Run your tests with the below command:
forge testIt’ll show if the tests passes or fails, then we debug if something fails.
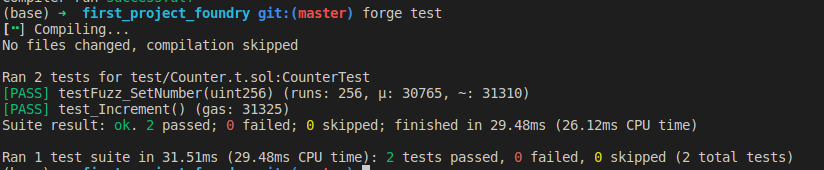 running the tests
There are multiple ways in which we test in foundry. We can run forge test with (-vv or -vvv or -vvvv) and each of them has different utilities.
- Level 2 (-vv): Logs emitted during tests are also displayed.
- Level 3 (-vvv): Stack traces for failing tests are also displayed.
- Level 4 (-vvvv): Stack traces for all tests are displayed, and setup traces for failing tests are displayed.
- Level 5 (-vvvvv): Stack traces and setup traces are always displayed.
Don’t forget to play around yourself with them.
Below attached is a screenshot, where you can see the stack traces for the tests.
 tests stack tracesChecking coverage:
Coverage simply means how much have you covered. While writing smart contracts, you need not to have 100% coverage always, but you must ensure that each of the functionalities and edge-cases have been tested well.
By running the below command, it gives the coverage of the smart contracts.
forge coverage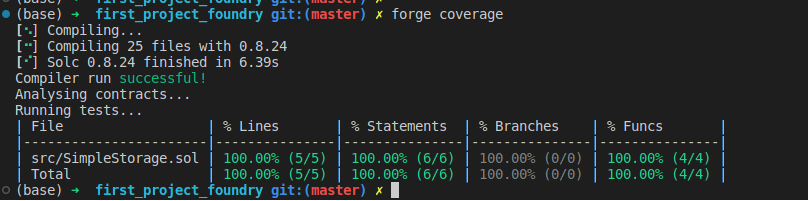
So far, we have written an amazing contract and tested it with the help of our old friend, Solidity. He’s much more capable now. That was all in the scope for this article.
Source code: https://github.com/dheerajkumardk/foundry_firstproject/tree/master
References:Let’s Get Foundry was originally published in Coinmonks on Medium, where people are continuing the conversation by highlighting and responding to this story.