4 free ways to screen record Windows 11 [2024 guide]
Knowing how to screen record Windows 11 is necessary, especially when you want to perform a software task, clip gameplay highlights, capture online classes, etc. Luckily, many screen recorder programs are available for Windows 11 PCs and laptops, including inbuilt tools (Game Bar, Snipping Tool) and professional third-party software (EaseUS RecExperts, OBS). Here, we will explore these screen capture software to optimize Windows 11 screen recording, empowering you to produce high-quality recordings for any purpose easily.
For your convenience:
- If you want to find professional video recording software to perform Windows 11 screen recording, tools like EaseUS RecExperts and OBS are good options. They can easily handle various recording tasks, but OBS is more suitable for professionals.
- For those who simply want to record screens in Windows 11 without any software, built-in programs (Xbox Game Bar and Snipping Tool) can meet your needs.
- Difficulty: Super easy – With the on-screen instructions and simple UI, this tool is easy to operate without any tech knowledge.
- Effectiveness: High – It offers many advanced recording tools for various recording tasks, and exports high-quality recorded files. Plus, it provides free and pro versions for different users.
- Limitations: Like most third-party applications, its free version only lets you save 1 minute of your recording. If you are a light user, that’s enough.
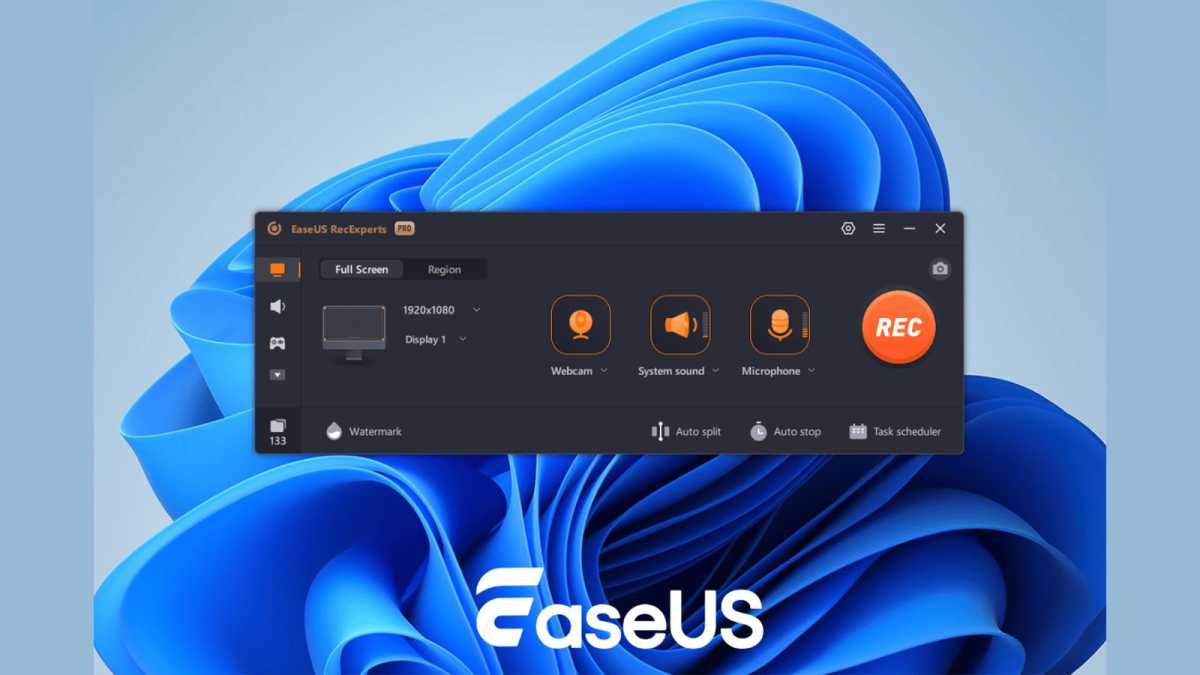
EaseUS RecExperts is an ideal Windows 11 screen recorder with audio for those who want to create high-quality video clips easily and quickly. This professional Windows capture software offers various recording modes to meet almost all users’ needs, including game recording, protected video recording, screen and sound recording, flexible screen recording, and more. You can also use it to screen record Windows 10 with audio if needed.
While recording, you are able to use the real-time annotation tools to add text or draw something on your screen. Plus, it can record up to 4K video resolution on your desktop screen and export it in various formats. Last but not least, it will leave no watermark on any of your recordings!
Step 1. Download and launch it on your desktop, and you will see a simple interface. To make a screen recording, choose the Record screen icon on the left panel to continue.

EaseUS

EaseUS
EaseUS
Step 2. Now, you can select your recording area. If you want to record the entire screen, click Full Screen. If you prefer to customize the recording range, select the Region option.
If you have a webcam, system sound, or microphone recording need, you can turn on the corresponding options respectively.
Step 3. To get high-quality recorded video clips, you can also click the gear icon to adjust recording parameters, like file path, video quality, shortcut keys, and so on. Once everything is ready, click REC to start recording.
Step 4. Finally, when your screen activity is over, click the stop button. You can preview your recorded videos by clicking Recordings. You can also edit your video clips here by trimming, adding opening credit, etc.
Record customized Windows 11 screen exclusively with the Snipping Tool- Difficulty: Easy – It has a neat interface and a single recording function.
- Effectiveness: Medium – It lets you record any region on your screen and export recordings in a common format (MP4) for sharing.
- Limitations: You cannot adjust recording parameters like format, resolution, etc. And the recording shortcuts are not available.
For Windows 11 users, the Snipping Tool is not only a tool for taking and editing screenshots but also a free Windows 11 screen recorder. This freeware offers a recording feature that lets you capture any region on your desktop by drawing a box. That means you can use it to record full or partial screen flexibly. If needed, you can even capture both audio (microphone or system sound) and screen simultaneously on your Windows 11 desktop.
However, to record the Windows screen with the Snipping Tool, your Windows operating system should be 22621.1344 or higher. You can click Settings > System > About to check the details.
Step 1. Enter Snipping Tool in the search bar and click on the result to bring up this free Windows 11 screen recorder.
Step 2. On the toolbar, choose the Record option (which looks like a camera). Next, click New to select the area you want to record.

EaseUS
EaseUS
EaseUS
Step 3. Once the recording region is selected, you can flexibly choose to capture the Windows 11 screen with your system sound or microphone audio simultaneously.
Step 4. When you are ready, click Start to perform the screen recording activity. Once you stop the recording, the recorded video file will start playing automatically in a Snipping Tool preview window.
Capture Windows 11 desktop directly via Game Bar- Difficulty: Easy – You can open and use this tool with a few shortcuts.
- Effectiveness: Medium – It supports recording a single Window and audio on your Windows 11 desktop and exporting files in HD quality.
- Limitations: You can only record screens for up to 4 hours. And it cannot record File Explorer and Windows desktop.
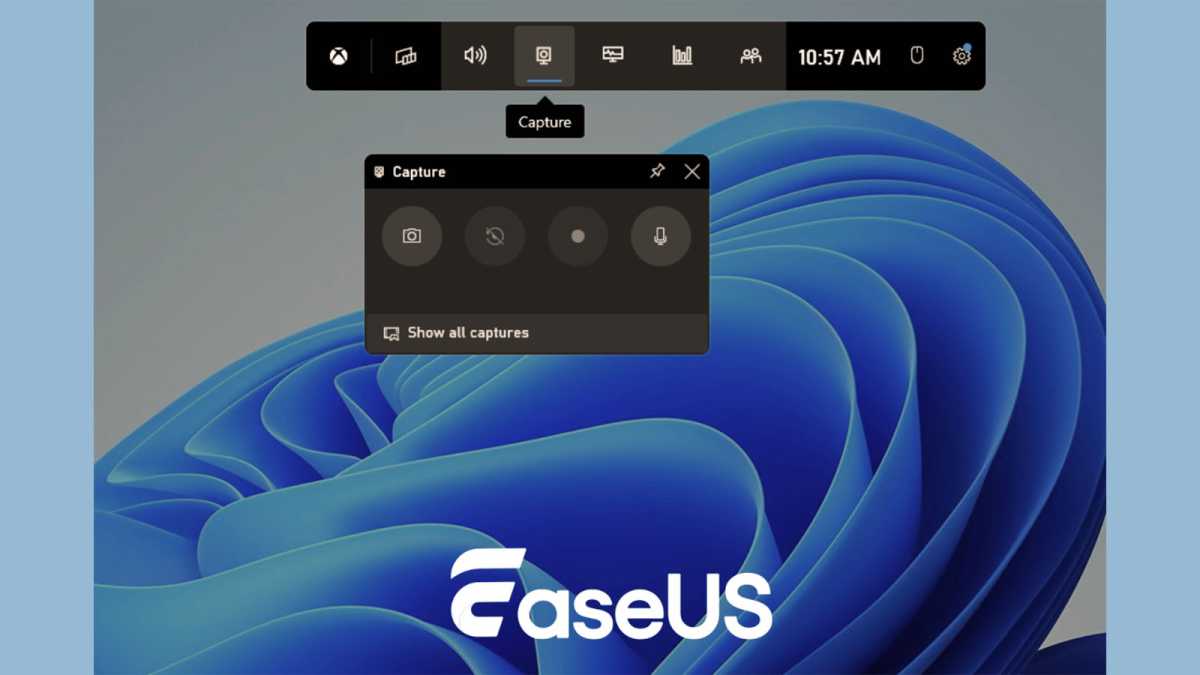
Another free Windows 11 screen recorder is the Xbox Game Bar. Like the Snipping Tool, it is also pre-installed on your operating system. With its aid, you can capture Windows 11 screens on a PC or laptop for up to 4 hours with just a few shortcuts and then export them in HD quality. Better than the Snipping Tool, Game Bar allows you to adjust the quality, frame rate, and hotkeys for your recording. However, you cannot customize your recording region.
Step 1. Press the Windows icon + G keyboard shortcut to open the Xbox Game Bar on your Windows 11 PC or laptop. Or you can enter the Xbox Game Bar in the search bar and select it in the menu.
Note: If the Game Bar is not showing up, go to Settings > Gaming > Xbox Game Bar and enable the feature.
Step 2. Next, you will see a floating toolbar with various icons. Click Settings to adjust your recording parameters, such as choosing the sound source and customizing shortcut keys.
Step 3. Return to the floating toolbar and select the Capture option. Then, click on the Start recording button or press the Windows + Alt + R hotkeys to begin your Windows 11 screen recording directly.
EaseUS
EaseUS
EaseUS
Step 4. During your recording, you can enable or disable your microphone at any moment. Once done, hit the same shortcut key, Windows + Alt + R, to end and view your video recordings by clicking Show all captures.
Advanced tips for recording Windows 11 desktop screen with Game Bar:
Click Settings > Gaming > Captures to adjust advanced recording settings, including:
- Aaving path
- Max recording length
- Record desktop screen with microphone, system sound, or both
- Video frame rate and video quality
- Difficulty: Hard – It’s difficult for novices to operate because of the complicated UI.
- Effectiveness: High – It provides numerous recording and streaming tools and allows you to customize your personal recording settings.
- Limitations: Like many open-source software, it lacks regular updating and technical support. You nearly cannot get help if something is wrong with your recordings.
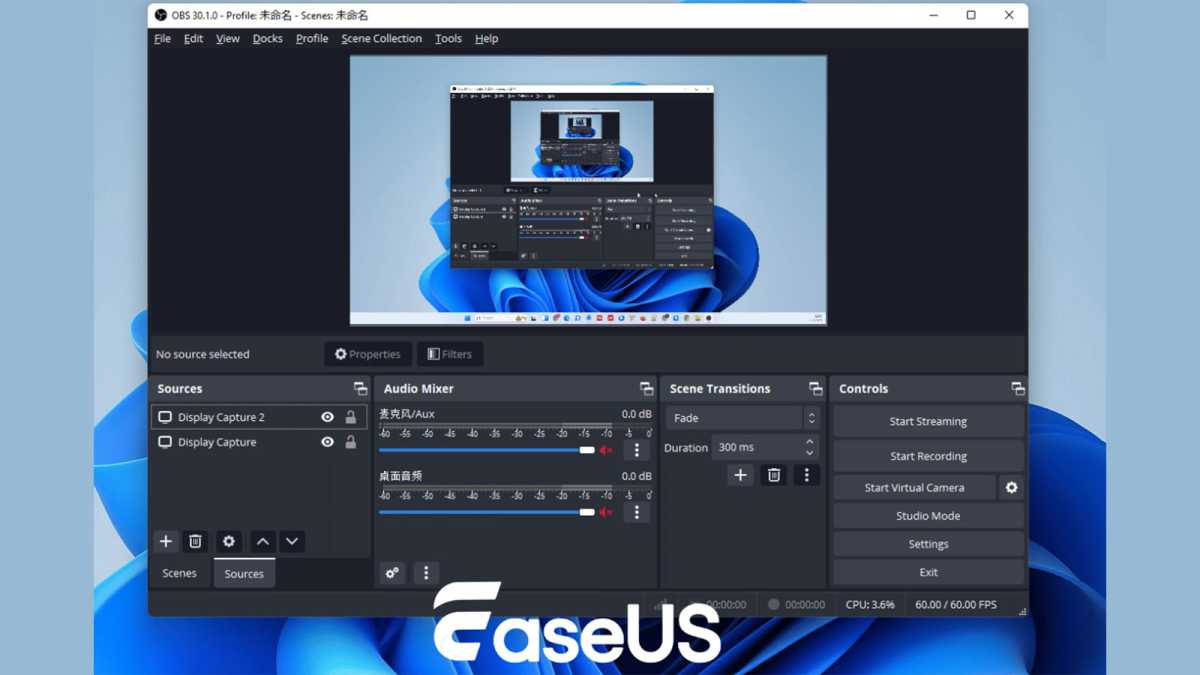
OBS Studio is a free, open-source Windows 11 PC screen recorder that allows you to create high-quality recordings and save them in MP4 format on your laptop.
This screen capture software lets you record any area on your desktop. It offers many advanced features to improve your recording experience, including capturing desktops with audio or webcam, capturing dual monitors, and more. With its help, you are able to complete almost any recording task.
However, OBS is difficult to use because of its complicated UI. So, it is more suitable for professionals than novices.
Step 1. Download OBS Studio from its official website and install it on your Windows 11 PC by following the on-screen instructions.
Step 2. On the main interface, click the + button under the Source tab and find the Display capture button. Then, you will be led to your screen as the display capture.
EaseUS
EaseUS
EaseUS
Step 3. To record a Windows 11 screen with audio, you can click the + icon under the Source tab. Then, add your Audio Input Capture.
Step 4. (Optional) Click Settings to adjust the recording parameters based on your needs.
Step 5. If everything is correct, hit the Start Recording button at the lower right corner to begin recording.
Tips for selecting the right method of recording Windows 11 screenWell! As you can see, there are numerous screen recorders that can help you capture screen activities on Windows 11 PCs or laptops. However, which one is best for you? Here, we will discuss it in detail.
First of all, you need to understand your requirements. If you are a general user who simply wants to share on-screen activities, you probably care nothing about the recording quality or something else. Then, some built-in free tools might help you. But, if you are a heavy user, like a content creator, you might place more weight on recording quality, tools, and many advanced features.
After knowing your own requirements best, you can start choosing a Windows 11 screen recorder by checking the items below:
1. Easy to use
An easy-to-use app will always improve your efficiency. So, you first need to check if the tool is friendly. Otherwise, you will waste a lot of time learning how to use it.
2. Recording features/quality
You might need to perform different recording tasks during work and life, so the screen recorder should be multifunctional. You need to make sure that whether its recording features and quality can meet your needs or not. Generally, a versatile screen recorder with high performance is more popular.
3. Price/trial
There is a wide range of pricing options for Windows 11 screen recording solutions, and you can obtain freeware or commercial applications. In most cases, a paid/freemium solution will offer more functionality and ease of use than free alternatives. You should prioritize solutions that offer the best value for money.
Record screen in Windows 11 FAQs 1. Does Windows 11 have a screen recorder?Sure! Windows 11 operating system comes with some built-in recording tools, like Xbox Game Bar and Snipping Tool. Both tools can help users capture Windows 11 PC or laptop screens with sound in HD quality. However, each inbuilt Windows 11 screen recorder has its own limitations:
- Game Bar: It doesn’t support capturing Windows desktop or File Explore. The max recording time is 4 hours.
- Snipping Tool: There is no keyboard shortcut to jump directly into Recording like there is for Snipping (CTRL+Shift+S).
To record screens on Windows 11 without any software, you can try online screen recording tools. These online services require no downloading or installation, and you can begin your Windows 11 screen capture activity as soon as you open its website. Here are some famous ones you can have a try:
- EaseUS Online Screen Recorder
- ScreenApp
- Clipchamp
You can use the shortcut keys to perform Windows 11 screen recording activities quickly. Below are some common hotkey combinations for recording:
- Windows + G: Open the built-in screen recorder – Xbox Game Bar
- Windows + Alt + G: Start recording the last 30 seconds
- Windows + Alt + R: Begin or end the screen recording
- Windows + Alt + M: Enable or disable the microphone while recording
- Windows + Alt + B: Turn HDR on or off